About a week ago Pat Flynn released his ninja email autoresponder trick.
If you haven’t heard of Pat Flynn I highly recommend you check out, subscribe to, and follow his blog. He calls himself the “Crash Test Dummy of Online Business”. He tests what works and reports back how well it does or doesn’t perform.
You will also find income reports of how much money he is making online every month and the exact sources of his income.
If you have any aspirations to utilize the internet in any capacity to make money, you need to add Pat Flynn to your list of blogs that you follow and read daily.
With that being said, his latest email autoresponder trick got an amazing response on the web the second he published the post. This trick allows you to update any links in your autoresponder sequence in one place instead of having to update each message individually.
Since Pat’s tutorial was focused on doing it Aweber, I figured I would create a tutorial post in how to do it in GetResponse.
Here’s how…
Autoresponder Basics
For review, an email autoresponder is a sequence of pre-written emails that are scheduled to go out at a pre determined time after someone subscribes to your email list. This is often referred to as your follow-up sequence.
It may look something like this…
Day 1 – Valuable training or information
Day 3 – Case study showing real life results from your expertise
Day 5 – Ask for engagement
…
Day X – Link to product for sale
A well thought out autoresponder sequence can do the following for your business:
- Keep in constant contact. Allows you to stay fresh in the minds of your subscribers.
- Build relationship. Delivering value up front is a great way to build trust.
- Keep leads warm. Which can have a positive impact on your engagement and open rates (and click-through rates).
- Consistent income. Highly effective sequences can turn subscribers into paying customers repeatedly.
So it pays to take some time and really determine how you would like to walk your subscribers through your marketing funnel using your email autoresponder sequence. If any of this is just a little confusing feel free to ask me a question in the comments area below.
How to Use Pat Flynn’s Email Autoresponder Trick
Before we get into the How-to of this trick, it’s important to understand why you would need to use it. A few examples come to mind:
- Updating your free offering
- Links to popular posts or pages on your site
- Upcoming webinar registration
By using this trick you can ensure that every subscriber gets the freshest, most up-to-date content from you once they subscribe. I hope you can now see how this trick will save you tons of time once you have multiple email sequences created and leads flowing through them.
HOW TO DO IT IN GETRESPONSE
As I mentioned, Pat Flynn’s tutorial showed you how to do it in Aweber. Today I’ll show you how to pull off the exact same strategy in GetResponse.
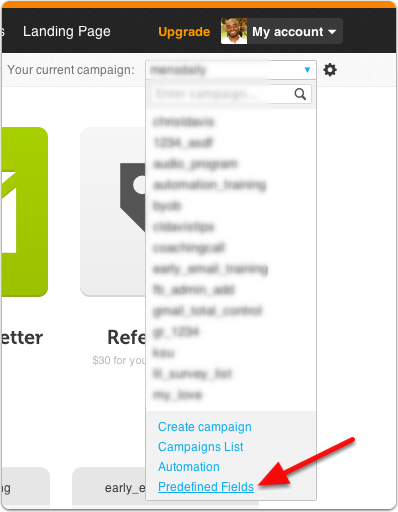
1. Select Predefined Fields
It’s important that you select the campaign first that you would like to use this Predefined Field on. You will need to create separate Predefined Fields for each campaign.
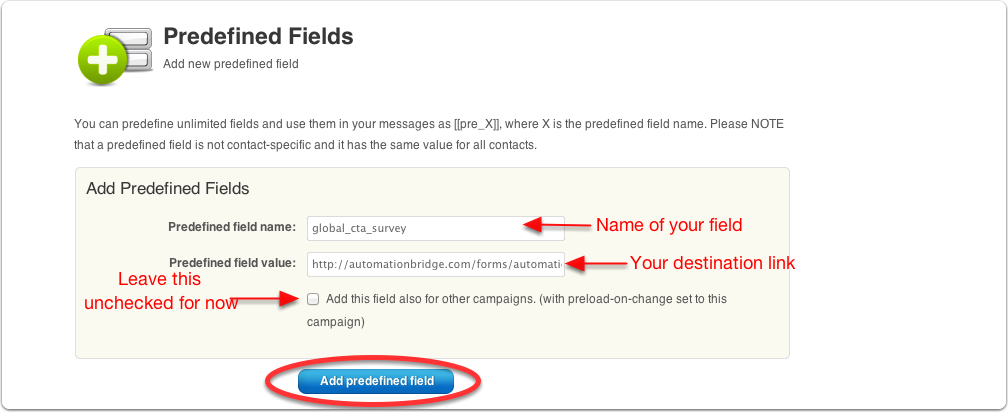
2. Create Predefined Field
Create a descriptive name for your Predefined Field. For the sake of this tutorial I have chose “global_cta_survey” as the name. For the field value I have set “https://automationbridge.com/forms/automation-audit“.
Once you’ve completed both the name and value hit “Add predefined field”.
3. Review Predefined Field
Now you should see your newly created Predefined Field. At any time in the future you need to update the value simply click in the field space and change the link/text. Once you’ve completed that make sure you check the box next to the Predefined Field and hit the “Go” button with the option “Update Selected”.
The yellow highlight is showing you what the Predefined Field will look like in your personalization drop down menu when you are creating your email.
You’re set to add this to your autoresponder message.
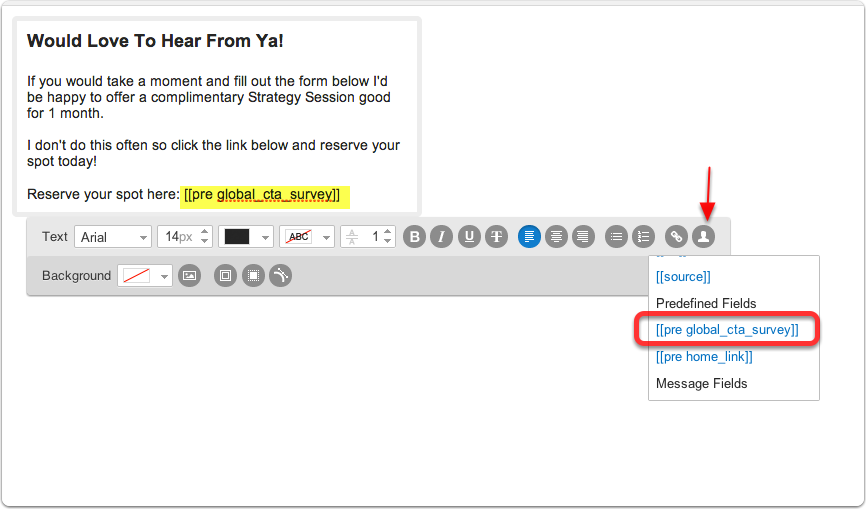
4. Add Predefined field to email message
In the body of your email, place your cursor where you would like to insert the new Predefined Field. Select the head and shoulder silhouette button and scroll down to the Predefined Fields section to select your newly created Predefined Field. Clicking on it will place it into your email message at the position of your cursor.
The yellow highlighted text above is where I imported my Predefined Field.
Now you’re ready to finish up your message and send it out.
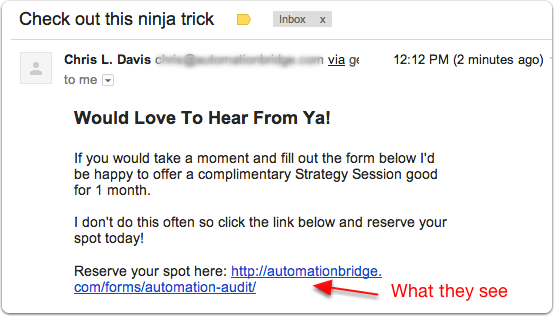
Now when people receive your email instead of having the Predefined Field text it will show the value you inserted. The one I created would look something like this in their inbox.
That’s it. If you would like to check out Pat’s full tutorial for Aweber you can find it here.
Otherwise I hope this tutorial was helpful in teaching you how to create Predefined Fields in GetResponse that can be easily updated from one place and change links in multiple autoresponder messages.


2 comments
Mauricio Torres
Looks great! But how can i make this into AC?
Thanks!
Chris L. Davis
Hey Mauricio you can do this in ActiveCampaign by using Message Variables. They function the exact same as outlined in this article. They’re under Campaigns -> “Edit Message Variables” (in the sub nav on the top left)